For the ribs, I am making them out of the same 0.063 sheet. I put a 3/4x3/4x1/16 angle at the top of the rib which will get nutplates so the shelf can be removable. I also cut lightening holes in them using two different hole saws in the drill press.
Each side gets two ribs. They get match drilled and finally tied to the bottom skin J-stiffeners with pop rivets later.
I and angle to the ends of the ribs to prevent them from collapsing under weight.
Here is the co-pilot's side all fab'ed up and cleco'ed in place.
Rear view of the co-pilots side looking fwd.
Next I started duplicating parts for the pilot's side. It was a bit of a brain teaser to do this without messing up! Here is the side skin translator assembly for the other side.
Used the shelf deck plate to match drill all the holes in the opposite side plate.
Added the angles front and back.
Match drilled to the battery box and the skin translator assembly.
Fabricated the opposite side ribs.
Clamped everything in place and match drilled the ribs to the deck and to the bottom skin J-stiffeners.
Here they are all ready to have the screw holes punched out to #12 and the nutplates added after priming. I likely won't pop rivet all the ribs and translators in until much later in the build.
Overall this took several hours but it will be worth it to have a nice secure place to mount avionics components down the road. The entire assembly is very strong and would be fine to crawl on.
Documenting the trials and tribulations of building a Van’s Aircraft RV-10 airplane.
Saturday, March 16, 2019
Friday, March 15, 2019
Rear Avionics Shelves Part Two
More napkin CAD to explain what I am doing.
And even more napkin CAD to explain it all.
So here I am aligning the co-pilot side shelf with the exiting battery bracket and the side skin translation assembly I created. It was a challenge to figure out how to position it all, hold it and then match drill it in place.
Here I added 3/4x3/4x1/16 angle to the front and rear edges of the deck plate to stiffen it all up.
Match drilled the deck plate to the side skin translation assembly.
Added additional match drilled holes to the battery tray.
Match drilled the side skin/ J Stringer translation assembly to the side skin J stringer. These will get pop rivets eventually when final assembly is done.
Next I got started fabricating the ribs that will go under the deck plate and support the shelf by tying into the bottom skin J stiffeners.
Thursday, March 14, 2019
Detour off plans! Rear Avionics Shelves!
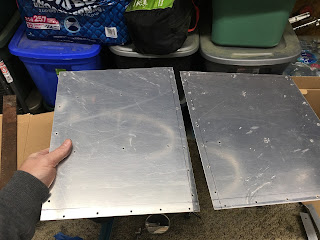
Got started on my custom rear avionics shelves I want to fab and get fitting while the whole tail cone is opened up and accessible. I made a cardboard template of the decks that I am going to cut out of 0.063 2024-T3 sheet. Don't want to waste this high dollar stuff!
Side one marked.
Side two marked.
Ready to cut!
The angles do not align with the side skin J stiffener and therefore I had to come up with a way to transition this fact. Here is what I came up with. It works well.
Since it is hard to see how it is made, I made a napkin CAD sketch. Sorry!
Side one marked.
Side two marked.
Ready to cut!
The angles do not align with the side skin J stiffener and therefore I had to come up with a way to transition this fact. Here is what I came up with. It works well.
Since it is hard to see how it is made, I made a napkin CAD sketch. Sorry!
Tuesday, March 12, 2019
Tail Cone...Final fitting before tear down
Started tonight by removing the top skins.
Then removed the top J stiffeners.
Drilled these seat belt anchor brackets to the longerons. They get set in 1/8" from the edge of the longeron.
When these holes are drilled per the plans, they break the edge distance rule. This is by design however. Not sure why but Van's has their reasons.
Did the other side.
Next I went ahead and punched out the hole required for the Cleaveland Tool static ports I bought way back there. They require a 1/2" hole.
I used the prepunched pilot hole in the skin as a guide and used a UNIBIT to make it full size.
Nice looking fit!
Next I upsized the pre punched hole on these inspection plate covers so that I could match ream them to #12.
Here I match reamed the screw holes to #12.
And then reamed the nutplate mount holes to #40 which is full size.
Finally I marked the right skin for the removal of this triangular extension that must be removed. No idea why Van's puts this on both skins other than the tooling must be common prior to bending them and making the L & R parts.
Monday, March 11, 2019
Today I ordered more cleco's which will bring my total to about 1050ea 3/32". I want to have plenty by the time I get to the wings. My theory is more is better with these jig-less assemblies to keep everything as straight as possible.
I have also been working out my plan for adding avionics shelves to the tail cone and working out my plan for provisions for a yaw damper servo.
I have ordered some sheet stock, extra angle and hardware to do something similar to this:
I also ordered Van's RV-10 AHRS mounting kit that looks something like this when installed:
And finally I ordered two of these ELT/Strobe mount kits Van's has for the RV-10. My understanding is that the bracket can be flipped over and used for both sides of the 10. One on each side will give me plenty of flexibility.
And I already have the Pitch and Yaw Damper Servo Mounts from Van's. I will have to tweak the Yaw Damper servo mount a little bit since it is designed for the RV-14 but can be used with the RV-10 with a little bit of work.
I have also been working out my plan for adding avionics shelves to the tail cone and working out my plan for provisions for a yaw damper servo.
I have ordered some sheet stock, extra angle and hardware to do something similar to this:
 |
| Photo by http://www.tcwtech.com |
I also ordered Van's RV-10 AHRS mounting kit that looks something like this when installed:
 |
| Photo by Rodrigo Damazio Bovendorp |
And finally I ordered two of these ELT/Strobe mount kits Van's has for the RV-10. My understanding is that the bracket can be flipped over and used for both sides of the 10. One on each side will give me plenty of flexibility.
 |
| Photo by Richard "Mouser" Williams |
Here is where I am at with that:
Now on to following the plans!
Got started tonight by drilling the aft deck to the assembly. First I drilled these holes that go into the F-1010A angle at the top of the bulkhead that ends up being the mounting point for the front HS spar.
Then I drilled the sides to the longerons. Ensuring to drill the holes straight and perpendicular to the deck.
I used the long drill to match drill these tight places.
Long drill required here.
Then I match reamed these two holes that get bolts using a #12 reamer.
Next I centered and clamped this F-1011D to the HS mount bars.
And used the long drill to match drill the holes to the deck, spacer, and the longerons.
Then I match reamed the end holes that get bolts using a #12 reamer.
Finally I centered, clamped and match drilled the F-1012D elevator stop to the aft deck and longerons. Finally I match reamed the end most holes of this angle using the #12 reamer.
Subscribe to:
Comments (Atom)


