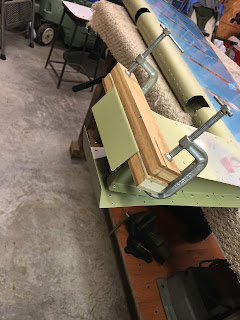
Started tonight with working on the counterbalance lead mounting and finishing the skins.
First I located the lead with the top screw hole that is already in the top rib flange. The lead gets centered between the skins.
Then I drilled the lower hole in the counterbalance rib flange by using the lead to locate it.
Next I put a slight crease in the skins by bending them slightly by hand. I also drew a reference line at the break point.
Then I used two blocks of wood to clamp the skins right on the crease. I put a slight radius on the block that has the bending edge. This is to prevent cracking the skin.
I used a plastic faced dead blow hammer to finish the bend after bending the skin down as much as possible by hand without deforming it. This worked really well. Just lite taps and work around the bend a little at a time and it eventually starts to lay down really nice. The left side done!
Moved the rig to the right side and did the same. Right side done!
Here they are as they came out of the blocks.
Next I taped them together really tight with the lead in place underneath. I have an assortment of larger sized clecos and this one fits the #19 hole really well and worked great to hold the lead in place.
While I did follow the directions on locating the holes for the counterbalance lead mount screws, I departed from them when it came time to drill them to final size. Since I have an angle drill and a #19 threaded bit, I decided to back-drill the holes to full size. This worked ok but if I were to do it over, I would not put the #40 starter hole in there, I would just locate and drill the hole full size from the back side by backing up the skin with some scrap. Van's method seems to leave to much of a chance for a wonky hole to get drilled.
Had to dimple a couple nutplates. Yes you can dimple them. This is required a bazillion times across the airplane. The dimples are for the flush rivets that go into the rib flanges.
Here are the rib flanges after I dimpled the screw holes for the #8 screws and after I drilled the counterbalance rib flange for the nutplate. The top rib was pre-drilled from Vans.
Dimpling the nutplate mount rivet holes.
Nutplate installed on the counterbalance rib.
Nutplate installed on the top rib.
Skins all closed up with screws in place. I had a very slight pucker or gap in the middle and I just decided to follow the directions and install the blind rivet in the middle. Worked like a charm. This can be hidden by filler during paint if I want to later.
Next I finished off riveting the skins to the two ribs. Easy peasy!
Rudder is done less the fairings! On to the horizontal stabilizer!


No comments:
Post a Comment