Showing posts with label Ordering. Show all posts

Wednesday, July 10, 2019

Wings have arrived!

So the wings finally arrived.  Vans missed their lead time and projection a little bit and it took a few extra days for ABF to decide to deliver my kit so this added up to about 3 extra weeks I was not expecting for lead time.

ABF canceled delivery three days in a row and ended up delivering my kit at about 7PM on a day where they claimed the delivery would take place between 9-5. 

When the truck finally arrived, I found that the spar box was in great shape but the other crate was busted open, missing part of the lid, bottom panel pulled loose, two metal bands missing, and the skids on the bottom broken off.


Thanks ABF!  You are now officially 0 for 3 kits (RV7 kits included) that you managed to deliver to be without severely damaging the crate!

 At first I figured there was no way that the contents would be intact and or not damaged.  Much to my surprise it appears that everything is still in there!  I have to do a complete inventory to be sure but it is looking good so far.


 Those beautiful spars are like airplane porn!


After pulling everything out and getting a look at it, all the parts seem to be undamaged.  The skins are OK  and while I still need to do a complete inventory to make sure nothing fell out, it looks like I got lucky!

Tuesday, July 9, 2019

Still waiting on wings!

So I really got behind the kit lead time curve on this one....

Van's lead times seem to be higher than what I am used to and they missed their estimate a bit.  Also the freight company is taking their sweet time getting the kit to me.

Hopefully I will get my wing kit tomorrow.

Tuesday, June 25, 2019

Still awaiting wings.....

Wing kit was suppose to be crated last week and I had hoped to be shipped by week end.  Still has not shipped as of today.  Best advice is order early as you can.  The lead times seem to be long right now!

Thursday, May 30, 2019

Waiting on wings

I did not die.....

Just waiting on the wing kit to arrive.

I made the final payment today and crating is scheduled for the 6/17/19.

I have a couple more things I can do to the tail kit but I am dragging my feet.  Vacation next week so no progress will happen till after.

Later gator!


Oh,

I did forget to post these pics of me drilling the elevator horns:

 Temp installed the left elevator.  Sanded down the drill bushing and put it in the center bearing.

 Used it to drill the left elevator horn.


 Switched sides and drilled the right elevator horn.

 Then I upsized the hole to almost 1/4" and then final reamed the hole to exactly 1/4" on both sides.

 Deburred the holes.

Deburred the other side.

Wednesday, April 10, 2019

Almost Forgot...I Ordered Wing Kit!

I almost forgot.... On Wednesday April 3rd, 2019 I ordered the slow build wing kit from Van's.  😊

It is scheduled to be crated the middle of June so hopefully I will have it by the end of June.

I ordered the optional electric aileron trim servo kit and the not so optional but listed as optional fuel level senders. 

Monday, March 11, 2019

Today I ordered more cleco's which will bring my total to about 1050ea 3/32".  I want to have plenty by the time I get to the wings.  My theory is more is better with these jig-less assemblies to keep everything as straight as possible.

I have also been working out my plan for adding avionics shelves to the tail cone and working out my plan for provisions for a yaw damper servo. 

I have ordered some sheet stock, extra angle and hardware to do something similar to this:

Photo by http://www.tcwtech.com

I also ordered Van's RV-10 AHRS mounting kit that looks something like this when installed:

Photo by Rodrigo Damazio Bovendorp

And finally I ordered two of these ELT/Strobe mount kits Van's has for the RV-10.  My understanding is that the bracket can be flipped over and used for both sides of the 10.  One on each side will give me plenty of flexibility.

Photo by  Richard "Mouser" Williams
And I already have the Pitch and Yaw Damper Servo Mounts from Van's.  I will have to tweak the Yaw Damper servo mount a little bit since it is designed for the RV-14 but can be used with the RV-10 with a little bit of work.

Here is where I am at with that:


Now on to following the plans!

 Got started tonight by drilling the aft deck to the assembly. First I drilled these holes that go into the F-1010A angle at the top of the bulkhead that ends up being the mounting point for the front HS spar. 

 Then I drilled the sides to the longerons.  Ensuring to drill the holes straight and perpendicular to the deck.

I used the long drill to match drill these tight places.

 Long drill required here.

 Then I match reamed these two holes that get bolts using a #12 reamer.

 Next I centered and clamped this F-1011D to the HS mount bars.

 And used the long drill to match drill the holes to the deck, spacer, and the longerons.

 Then I match reamed the end holes that get bolts using a #12 reamer.

Finally I centered, clamped and match drilled the F-1012D elevator stop to the aft deck and longerons.  Finally I match reamed the end most holes of this angle using the #12 reamer.

Monday, November 19, 2018

Delays

Well I was on a roll then life got in the way.

No progress in almost two weeks.....

We have had business trips, college evaluation trips and our chapter hosted the B-17 tour from Thursday till Sunday last week and it totally took all my free time this past weekend.

Hopefully I can get the elevators primed Wednesday night so I can start assembly this weekend.

Got my elevator trim cable mounts and some pro-seal and more clecos in the mail last week....


Monday, August 27, 2018

Geesh will the ordering never stop?

So just when I think I have everything I need on hand, I think of some more items that I will need.

While spending some time viewing other build blogs and videos I realize that I don't have enough cleco's.  I have 540ea 3/32" and 230ea 1/8" ones.

I decided to order 300 more 3/32" and 100 more 1/8" ones from Van's.  Van's seem to have a great price and my understanding is that they sell WedgeLoc brand which is what I have now and they have been great tools for me while building the RV-7.

I also ordered some misc hardware that I know Van's does not include with the kits but that are very handy to have.  I ordered some flush 3/32" pop rivets for the occasional impossible to set rivet that is on a skin somewhere.  I also got some various special nutplates for the occasional modification I may want to do.  One area that I know I want to use a nutplate is on the elevator trim cable attach bracket that is riveted to the aileron trim inspection cover.  My understanding is that if you rivet this bracket to the cover, it makes it very hard to deal with in the future.

I also picked up some oddball sized cleco's from Brown Tool.  I got 6ea of a #12, #16, #27, & 1/4" for the places where clecos help but having the right size is critical.  Think nuplates, brackets and other places like where #6, #8 screws and AN3 & 4 bolts go.  Picked up another pack of Snap-Socs for riveting the universal head rivets.  I learned to love these things when I was building my RV-7.  Helps prevent smiles and damage to the parts around the rivets.

Realized I have lost my 3/32" cupped rivet set for the squeezer so I picked up another one of those from Brown Tool as well.

Finally I ordered the specialized RV-10 bucking bar from Cleveland Tool.  This thing is expensive for what it is but I don't want to use pop rivets on my elevator skins if I can keep from it and this tool while it looks easy to make, I just decided to buy one ready to go.

Picture courtesy of Cleveland Aircraft Tools
Also got a new set of Pop Rivet Dimple Dies from Cleveland.  The ones I had for the RV-7 never worked that well.  Were cheaply made and are all rusted up.  I decided to only purchase the 3/32" size since I really don't foresee any reason to need a 1/8" one.

Picture courtesy of Cleveland Aircraft Tools

And finally I remembered that it would be a great idea to go ahead and install the static ports in the tail cone while it is all wide open.  I decided to use the Cleveland Tool static ports and got their kit for plumbing it all up.  I have had great luck so far with these types of tubes and fittings in my RV-7.

Picture courtesy of Cleveland Aircraft Tools


Saturday, August 25, 2018

Just a waiting game

Empennage kit is set to deliver Monday.  While waiting I took the time to make another tool.  Made a nice backer board for my backrivet plate.  This is way nicer than what I used to hold it during my RV7 build.


Routed out for the plate and then rounded the edges to prevent skin damage.

Also got a small order from Van’s today.


All of the RV-10 and options plans on a USB stick!  How awesome would that have been back in the RV7 build days!  Uploaded them to Google Drive so I can access them anywhere.


Picked these up as well so that I can go ahead and install them in the tail-cone while it is wide open.


Wednesday, August 15, 2018

I have a new builder/serial number!

So I have a new RV-10 builder/serial number for my build.  It is #41942.

Anne-Marie at Van's confirms my kit is in the crating department being packed.  It won't be long now!

Monday, August 13, 2018

Ordered Emp/Tail Cone kit and some tools and consumables

Today I filled out and sent Vans the official order form.  Whew this is gonna consume a lot of money and time!

While ordering from Van's, I went ahead and picked up some pro-seal for gluing in the foam pieces in the elevators, double sided construction tape for riveting the trailing edges of the elevators and rudders, and I picked up the Van's G3X Yaw Damper and Pitch Servo Install Kits for the RV-14 that can be used with slight modification with the RV-10.  It is best to install these items while the tailcone is wide open rather than waiting till later.


I also placed an order with Aircraft Spruce for the AKZO primer I plan to use on the parts.  This is a 2 gallon kit.   Also ordered some drill bits and reamers to replenish my stock.  I will go thru a ton of bits with this build.


Then went to Cleveland Aircraft Tool and picked up some 1" 3M Cut & Polish/Debur wheels for use with the die grinder.  I found that these things while pricey are the cats meow on deburing all the parts!


Then I went over to Amazon and picked up a spray gun kit from 3M.  This is one of the newish Accuspray PPS system guns.  It comes with these special paint cups that use disposable liners and lids with built in filters.   You can mix right in the cup, spray and then throw away the liner with little to no cleanup.  This gun also uses transparent spray nozzles that are easier to clean and you can toss when they get to cruddy.


Thursday, August 9, 2018

DRDT-2 frame build part 1

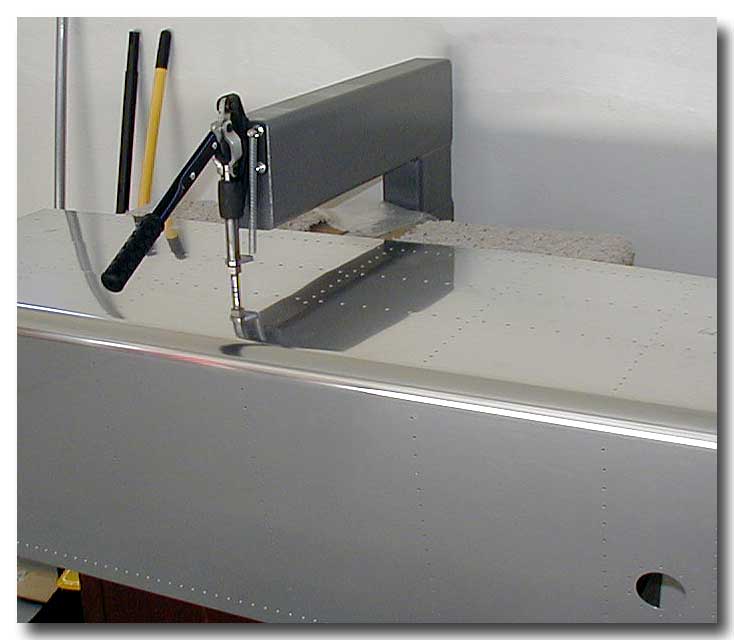
Ordered the steel to make my own DIY frame for the DRDT-2 dimpling machine.  I built one of these for my original RV-7 I built and found this tool to be a Godsend.  I would never build another metal airplane without one of these.

Here is an example of a finished tool:

Photo Credit: Experimental AERO

This tool was created from the mind of Paul Merems.  He started a company way back when selling these tools.  His website can be found here: Experimental AERO


Photo Credit: Experimental AERO

Photo Credit: Experimental AERO


Paul is kind enough to put the plans for building your own frame on his website.  He did a great job with the mechanical design!

I was able to purchase the steel for the frame wholesale thru a contact at my work and it should be here tomorrow.