Saturday, September 29, 2018

Horizontal Stabilizer Spar Riveting

Short assembly time today since I had to help my uncle (neighbor) to switch and old sliding glass door out to a fake french patio door.  This was a real chore since the brick in his house was laid up to the old door without any sort of brick molding.  Also after 40 years, there was some rot on his flooring under the original door and just inside that had to be cut out and replaced.  We got er done and then I had a few minutes to work on the plane parts.

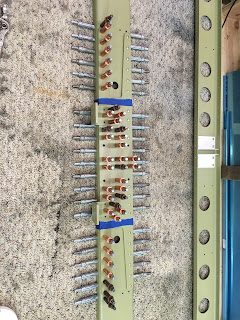
 Reassembled all the rear spar parts with cleco's.  The blue taped holes do not get rivets at this time.

 Used the squeezer on all of these rivets.  Had to be careful with alignment since the flanges are so wide with the spar caps hanging out a bit that the edge of the yoke would hit the spar cap and scratch it and or cause the set to slightly touch the spar doubler around the edge of the manufactured head of the rivet.  This leaves a little concentric smile mark just to the rivet on the base material.  I don't like that!

Next I riveted on the powder coated steel hinge brackets.  Van's wants the manufactured heads on the brackets for some reason.  This goes against the normal advice to put them on the thinnest/weaker material.  Oh well....I just follow directions.

Riveted the center hinge bearing block together.  This was the first part riveted on my original RV-7.  Since it is a sealed bearing, I went ahead and primed it as well since the bearing is mounted in some raw aluminum.

 Torqued the bearing block mount bolts.  Even with a small 1/4" drive torque wrench, the torque required for the AN3 bolts is very low.  It is at the bottom of this wrench's scale.  Very little "clicking" can be felt at the proper torque.  Be careful not to over torque!

 Rear spar ready for the next steps!

 Front spare all assembled with cleco's.  Similar process to the rear except there are a ton more different size rivets required.  Pay attention to the drawings!

 Top row of spar, doubler, and spar cap rivets done.

Front spar all finished and ready for the next steps!  The missing rivets are intentional.

Wow this sure was a ton of work to get to the point of being ready to use these spars in the actual HS prep process.  Building a HS for a -10 is almost like building a wing for the RV-7 as far as work required.


Friday, September 28, 2018

Horizontal Stabilizer Priming...and a few other things!

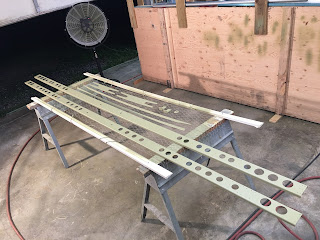
 Started this evening with scrubbing all the HS front and rear spar parts with BonAmi and maroon scotchbrite pads.  Then lay the parts out to dry.  I speed up the drying process by blowing off the parts with compressed air and turning a large fan on them.

 While I wait for them to dry, I scuffed up all the powdercoated steel hinge brackets.  These will get painted with the plane and if you don't scuff them now, it is very hard to do properly later.

 Next while waiting I started prepping the ribs per the directions.  You have to cut some of the flanges off of 4 of them.  2 get 2 flanges removed and 2 only get 1 removed.

 I used the bandsaw to make the necessary cuts.

 Here they are all cut.

 Next I bent the nose of the two ribs that had both flanges cut off per the directions.

 And on the same two ribs you have to tweak the end flange a bit.

 Mixed up 12oz of AKZO and it is cooking off in the PPS cup.  Love this PPS system.  Very easy to cleanup!

Parts all primed!  I ran out of primer on the very last part of the last pass on the spars.  Got lucky!  That is it for today!


Thursday, September 27, 2018

Horizontal Stabilizer Spar Final Prep and Part Deburring!

 Finished prepping the HS front spar by match drilling a few more holes.

 Then reaming the same holes to final size.

 Countersinking eight holes on the web of front spar.

 And then countersinking nine holes on each side of the front spar, both flanges.
 Side one....

 Side two...

Then I got to work cleaning up the edges of the spar doublers.   These things are rough out of the gate.  The vixen file is a huge help.

 Then I took the vixen file to the flanges of the rear spar.

 Deburred the holes of the rear spar doubler.

 Deburred the holes of the rear spar. (Only the holes that have been match drilled to something at this point)

 Found my old deburring tool that helps deburr long straight edges.

 It has a hardened V Notch tool.


 And there is a different tool that you can spin around the inside edges of holes and get them as well.


 Here is what that bit of tooling looks like.

 Next I used the cut and polish wheels to do the final smoothing of the edges and the holes.

 Then I deburred the holes of the front spar doubler.

Then I deburred the holes of the front spar mounting brackets.

Then I deburred the holes of the front spar doublers.  There are two of them.

Then the holes of the front spar itself.  (only the holes that have been match drilled to something at this point)

This is how I get to the inside of the spar flanges where the drill motor gets in the way.  This keeps the deburr bit as straight as possible to the hole.

Next I took the vixen file and cleaned up the edges of the front spar doubler.

A small rounded back file is used for the large radius corners.

Used the cut and polish wheel to do the final smoothing.

Used the large cut and polish wheel to deburr both the front spar caps.

Then I took the vixen file and cleaned up the edges of the front spar flanges.

Then I used the deburr tool to clean up the holes of the front spar.  Both sides.

And the cut an polish wheel to do the final finishing.

This small pile of large parts represents a ton of work!  There are a bagazillion holes in these parts that have been match drilled, deburred etc.  I am going to prime this pile tomorrow and rivet them both together before moving on.  For some reason this is how the directions are written so there must be a good reason even though it is not obvious.


Wednesday, September 26, 2018

More Horizontal Stabilizer Spar Prep

 Got started by marking all of the spar cap strips.  You have to trim tapers on the ends of them.  Just mark them per the notches in the parts per the directions.

 Then I used the band saw to trim them all.  There are 2ea of 3 different ones for 6 total.  I always cut to the outside of the line and use the smoothing process to bring the cut to the line.

 Then I smoothed out the bandsaw cut marks.   Be careful to not remove too much material and end up with edge distance issues.

 Then I clamped one of the front spar caps into place.  Thes are bowed out of the box so use plenty of clamps and force it down into the right place.  The trimmed flanges sit on the spar web.

 Then I match drilled the double and spar holes to the spar cap.

 
Removed all the cleco's and clamps and cleaned out all the drill chips.  Then put it all back and then match drilled all of the spar flange to spar cap holes.  There are a ton of them!

 Side one complete.  Now time to do the other side!

 Side 2 #30 holes done!

 Drilling side 2's #40 holes.

Front spar caps all drilled to the spar and spar doubler.  That is a ton of holes!  Aluminum chips everywhere!