Showing posts with label Preparing. Show all posts

Wednesday, July 10, 2019

Wings have arrived!

So the wings finally arrived.  Vans missed their lead time and projection a little bit and it took a few extra days for ABF to decide to deliver my kit so this added up to about 3 extra weeks I was not expecting for lead time.

ABF canceled delivery three days in a row and ended up delivering my kit at about 7PM on a day where they claimed the delivery would take place between 9-5. 

When the truck finally arrived, I found that the spar box was in great shape but the other crate was busted open, missing part of the lid, bottom panel pulled loose, two metal bands missing, and the skids on the bottom broken off.


Thanks ABF!  You are now officially 0 for 3 kits (RV7 kits included) that you managed to deliver to be without severely damaging the crate!

 At first I figured there was no way that the contents would be intact and or not damaged.  Much to my surprise it appears that everything is still in there!  I have to do a complete inventory to be sure but it is looking good so far.


 Those beautiful spars are like airplane porn!


After pulling everything out and getting a look at it, all the parts seem to be undamaged.  The skins are OK  and while I still need to do a complete inventory to make sure nothing fell out, it looks like I got lucky!

Wednesday, April 10, 2019

Almost Forgot...I Ordered Wing Kit!

I almost forgot.... On Wednesday April 3rd, 2019 I ordered the slow build wing kit from Van's.  😊

It is scheduled to be crated the middle of June so hopefully I will have it by the end of June.

I ordered the optional electric aileron trim servo kit and the not so optional but listed as optional fuel level senders. 

Tuesday, December 4, 2018

Tools, Consumables and Misc Elevator Stuff

 Tonight I got started by building this break tool from some oak boards and a piano hinge from Lowes.  Wanted it to be nicer than the one I used for the RV-7.  Success!

 This gets used to finish the bend in the trailing edge of the elevator trim tabs.

 You put them in here and squeeze it down just the right amount.

 I had to purchase another scale tonight since I am close to needing to open the black death.  The wife sold the one I used with the RV-7 in a yard sale sometime in the past 10 years.  :(

 Next I followed the direction and got some spray glue for the templates that get glued to the foam rib stock for the foam elevator ribs.

 All glued and drying.

 Then I match drilled two aluminum angles to serve as trailing edge straightening devices.  Not sure if I am going to pro-seal them or use the VHB tape like I did for the rudder.

 Next I countersunk the AEX trailing edge wedges for each elevator.  Somehow I did not do them when I was suppose to.

All cleco'ed awaiting the next step...

Wednesday, August 29, 2018

More tools and an option arrived today.

Got my order from Cleaveland and Brown Tools today.

From Cleaveland I got a special RV-10 bucking bar that is required on the elevators if you don't want to use blind rivets.  Also picked up a new 3/32 close quarter dimple die set and some magic riveters tape. (it really is magic!) and the optional static air port kit.

From Brown I got a couple universal head rivet sets a new #12 piloted countersink bit, a new bag of snap-socs, and 6ea of #27, #16, and #12 clecos for those occasional odd holes that need a clamp.


Monday, August 27, 2018

Geesh will the ordering never stop?

So just when I think I have everything I need on hand, I think of some more items that I will need.

While spending some time viewing other build blogs and videos I realize that I don't have enough cleco's.  I have 540ea 3/32" and 230ea 1/8" ones.

I decided to order 300 more 3/32" and 100 more 1/8" ones from Van's.  Van's seem to have a great price and my understanding is that they sell WedgeLoc brand which is what I have now and they have been great tools for me while building the RV-7.

I also ordered some misc hardware that I know Van's does not include with the kits but that are very handy to have.  I ordered some flush 3/32" pop rivets for the occasional impossible to set rivet that is on a skin somewhere.  I also got some various special nutplates for the occasional modification I may want to do.  One area that I know I want to use a nutplate is on the elevator trim cable attach bracket that is riveted to the aileron trim inspection cover.  My understanding is that if you rivet this bracket to the cover, it makes it very hard to deal with in the future.

I also picked up some oddball sized cleco's from Brown Tool.  I got 6ea of a #12, #16, #27, & 1/4" for the places where clecos help but having the right size is critical.  Think nuplates, brackets and other places like where #6, #8 screws and AN3 & 4 bolts go.  Picked up another pack of Snap-Socs for riveting the universal head rivets.  I learned to love these things when I was building my RV-7.  Helps prevent smiles and damage to the parts around the rivets.

Realized I have lost my 3/32" cupped rivet set for the squeezer so I picked up another one of those from Brown Tool as well.

Finally I ordered the specialized RV-10 bucking bar from Cleveland Tool.  This thing is expensive for what it is but I don't want to use pop rivets on my elevator skins if I can keep from it and this tool while it looks easy to make, I just decided to buy one ready to go.

Picture courtesy of Cleveland Aircraft Tools
Also got a new set of Pop Rivet Dimple Dies from Cleveland.  The ones I had for the RV-7 never worked that well.  Were cheaply made and are all rusted up.  I decided to only purchase the 3/32" size since I really don't foresee any reason to need a 1/8" one.

Picture courtesy of Cleveland Aircraft Tools

And finally I remembered that it would be a great idea to go ahead and install the static ports in the tail cone while it is all wide open.  I decided to use the Cleveland Tool static ports and got their kit for plumbing it all up.  I have had great luck so far with these types of tubes and fittings in my RV-7.

Picture courtesy of Cleveland Aircraft Tools


Saturday, August 25, 2018

Just a waiting game

Empennage kit is set to deliver Monday.  While waiting I took the time to make another tool.  Made a nice backer board for my backrivet plate.  This is way nicer than what I used to hold it during my RV7 build.


Routed out for the plate and then rounded the edges to prevent skin damage.

Also got a small order from Van’s today.


All of the RV-10 and options plans on a USB stick!  How awesome would that have been back in the RV7 build days!  Uploaded them to Google Drive so I can access them anywhere.


Picked these up as well so that I can go ahead and install them in the tail-cone while it is wide open.


Monday, August 20, 2018

DRDT-2 Part 4 and other stuff


Finished mounting the front end kit onto my DRDT-2 frame I built.  Tested it out on some scrap and all looks good!


Cut a piece of 3/4" plywood and screwed it to the top of my new roll around tool chest to give me another work surface.  Looks and works great!


Sunday, August 19, 2018

Cleanup on isle 10 part 5

Success!  The garage is now ready!  WHEW!  That was a ton of work!


Here is an almost 180° panoramic photo of the new shop.  For perspective, that garage door is 16' wide.  Most of the time my wife's mini van will be in here as well.  When I need the space, it will be required to park outside.

Tools tables and toolboxes

 Over the weekend I continued to work on getting the garage back into airplane building mode.  I had this cart that my uncle gave me that he did not use.  It was the frame/cart for one of the Harbor Freight tool chest.  All he wanted was the box and he gave me the cart.  I used some leftover hardwood flooring to make a work surface and a shelf.  Should be handy at some point.


 I also added a hardwood shelf to the bottom of this workbench for storage.  My uncle and I built this bench when I was 9 years old!


I plan to keep most of my power tools mobile for this build.  Last time I had them all mounted solid to a bench or a stand of some sort.  This time I plan to just pull them out when needed to save space in the garage.


So I have a ton of tools that I needed to bring back from the hangar.  Most of my airtools, sheet metal tools, riveting tools, etc.  I moved all of that stuff to the hangar when I took the RV-7 there for final assembly.  Now it has to come back and I needed someplace to store most of it since my home tool box is full to the brim!  I had a super coupon for Harbor Freight's 5 drawer rolling tool chest and picked one up to augment my storage.  Say whatever you will about HF stuff but these US General tool chest are the best bang for the buck there is!


The grinder gets its own pedestal.   This thing is heavy!  It allows me to get long parts to the debur wheel easily!


The drill press came in handy on the last build.  I had to purchase a new band saw since I completely wore the old one out on the last build.  

Picked up a few more misc. items that I know I will need.  Roloc knockoffs from HF, plenty of Sharpies, swivels for the air tools, a new automatic center punch, an electric screwdriver for deburing, a number drill bit set so that I have all of them for the occasional odd size, an organic vapor rated respirator mask, a right angle die grinder for the Roloc pads, and finally my shipment of 3M cut and polish wheels for the die grinder/deburing!


Friday, August 17, 2018

Cleanup on isle 10 part 4

More of the same.  Another pickup load of stuff to the dump.  I can see the light at the end of the tunnel!

Thursday, August 16, 2018

3M PPS Accuspray Primer Gun

Received my new 3M PPS Accuspray Primer Gun.  This gun is intended to be easy to use and clean as well as high performing.  While I will only be using it for primer and maybe interior paint, I purchased this mostly for the priming of airframe parts.

The gun's man body is composite which is much different than the typical aluminum castings.  The spray nozzle is also made out of plastic which is also a major departure from the typical metal guns.


The body feels like it is high quality although you can tell it is composite since it us much lighter than typical metal guns.  The knobs are smooth and should work great for fine tuning the fluid flow and the fan pattern.

The gun comes with a flow restricting regulator and pressure gauge and the recommended pressure is at the gun when the trigger is pulled is 20psi for the 1.4mm and up spray nozzles.  Smaller nozzles are recommended at 24psi.


The gun is designed to use easily replaceable spray nozzles.  They are almost considered throw away and I assume many paint shops use them once and chuck them but many people report that they can last a good long time if you take care of them properly.  The Accuspray system has five different size nozzles available: 1.2 mm, 1.3 mm, 1.4 mm, 1.8 mm, 2 mm  The spray nozzles are clear to make it easy to see when they are clean.  They can be rotated up to 90° to get the spray pattern direction you want.  3M claims you can clean these nozzles with very little solvent.  We will see....


Next is the cup system.  This system is intended to be easy to clean (throw away the wetted parts), convenient in that you can mix right in the cup and a filter is built right into the lid.  The cup also allows paint to flow in all positions...even upside down!


It has a quick attach feature where it can connect to the spray nozzle with just a slight twist.
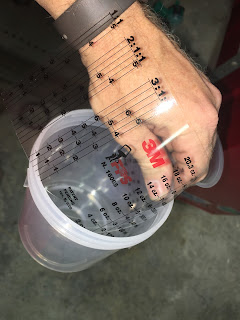


The cup system includes a mixing insert that is intended to be reusable.  It goes in the cup before installing the disposable cup liners.


The disposable cup liner goes in next.


The lids have built in filters.  You don't have to strain the paint with a separate filter.  The blue ones are 125 micron and the clear ones are 200 micron.


The PPS system cups, lids and inserts are available in several sizes.  micro (3oz), mini (6oz), midi (13.5oz), standard (22oz), and large (28oz).  Since the gun kit came with a standard size cup, I purchased a 50 pack of lids and liners.  Should be enough to cover my entire RV-10 build.